Showing posts with label gardening. Show all posts

July 01, 2012

Little home improvements

We went to the farmers' marker twice this weekend (more on that later), but today we went for produce and flowers for the yard.  There's this old raised garden bed made of treated wood with partial sunlight in the backyard- not ideal for veggies.  The neighbor was eyeing the weeds that seemed to be multiplying each day, so we used this as a simple spot for yard beautification.

We bought ten small perennials- a bargain at the market for $19!  Those big garden centers sell you bigger plants for $6, $7+, but it doesn't really matter since perennials can grow quite a bit if you're patient enough!

Here's a list of what we got: two delphiniums, poppy, sedum, columbine, lupine, balloon flower, astilbe, coral bells, and hollyhock.  Whew, I remembered it all!


Anyways, we weeded the garden bed and tilled it with a bag of perlite to loosen up the hard soil.  I planted everything and put a bag of cypress mulch around it all to hopefully keep out the weeds.  I put the plants that should be the tallest in the middle and the others around the edges and corners.


I love how it turned out and it got me really excited to continue working on the yard this summer and for many to come!


May 31, 2012

April & May project progress + June plans

What I wanted to accomplish in April/May:

1. Homemade vanilla extract
2. Fabric mushroom topiary
3. Move perennials
4. Mini terrarium necklace
5. More terrariums

How did I do?

1.  Done and done! 


This is a picture from right after I made it, now it's super dark now- I need to get a picture of it and it hopefully find some cute little bottles to give it to friends and family.


2.  Mmmm... sort of.  I made several mushrooms, but didn't really like the way they turned out.  Then I threw them at cats, hoping they'd play with them since they seemed fascinated in what I was doing, but after that they lost interest.  I kept one for a pincushion, but it doesn't work too well, as the needles keep getting lost inside.  Oh well!  I will probably try again at some other point.


3.  Ferns have been moved to under the evergreens.  Some died, some survived.  Now I may try to pull away the creeping charlie, till the soil, and move a few bigger, hardier plants.  After that I'll probably move  on to the hostas and day lilies.  


4.  Yes!  This took some time, but I love the result and I want to make more with the rest of my bottles soon.


5.  

I made another terrarium, but it's had to be redone once.  The first time there was too much water sitting around the rocks in the bottom, so it started to grow algae and the moss was too dry so it died.  I replanted the whole thing.  I think the key will be to mist the surface with a spray bottle to keep the water where I need it. 


And here's what I want to do in June:


1. Pack, pack, and move!

Yes, the last day in my apartment is June 30th and then I'll be living with Mark.  I'm totally excited, but moving is rough, and even though I've been moving a few things here and there, I still have a lot to go through before I'm done.

2. Make a color sketch of what I might do with my tattoo.


Now that I think the black is the way I want it, I'm itching to add color.  I've been contemplating it for some time and think that it's what I want to do.  So, even if I can't do it for a while, at least I'll be ready for when I want to change it up.

3.  Decorate the porch!


I've added a few things so far.  It's a great hang-out space, but it's also so huge that I don't know what to do with it.  Mark added a hammock.  <3 <3 <3  So perfect!


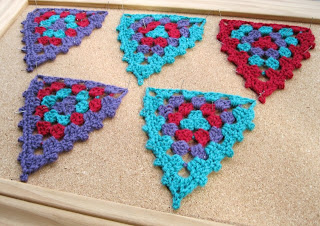
This is porch-related, but I really want to make this bunting.  When I started making granny squares, I wrote that I wanted to make a prayer-flag style granny square hanging, and later decided that I didn't really like it, but this pattern may be perfect!  I've also seen other more sewn bunting, so I may just make a whole bunch of varieties!  Like I said, it's a huge porch to fill!

5.  Decorate an old pair of plugs.  If you search on Etsy for decorative plugs, you're sure to find some plastic pairs that have a flower or something mounted to the front of the plug.  Well, I have loads of plastic earrings lying around, so I figure with the right glue and flower (or whatever I can find!) I'll be able to make some new, cute gauged pieces for pretty cheap!


I hope I complete these goals- the weather makes it hard to stay indoors... but I'm ok with that!

May 13, 2012

A (finally!) spring-ish Saturday


We woke up early yesterday.  Mark brewed beer and I investigated how my plants are doing so far.  The pansies have recovered from a rough start and are full of blossoms and buds!  My other flower seeds are sprouting and I can't wait to get them into the gardens and pots.


After breakfast and a bike ride we went to Craftstravaganza at the Minnesota State Fairgrounds and I ran into my dear friend, Diana, who blogs over at :dianapantz:!

My haul:


I wish I'd done better at remembering where I got what, but I grabbed so many business cards for vendors' websites and Etsy stores I wanted to check out, that I can't figure out where I got each item.

1. Amy Jo: cute cat print on wood.    2. Little flower hair clip.    3. Felt owl pin.    4. Squirrel pin- I got to make this myself at the Minnesota Center for Book Arts!  They had books and magazines that you could cut a picture from and make your old little free button (although I did feel guilty cutting up an old Disney storybook).    5. Burlesque of NA:  fruit and veggie print.  I have several prints from them, and generally love the stuff they make, and this will be perfect in our kitchen!


I saw so much stuff I would have loved to buy, but stayed way under my budget and waited till I saw everything before I spent any money.  I also got inspiration for things I can make on my own with supplies I already have!  After we were crafted out, we went for a walk, beers, and snacks.


Yummy cheese plate outside at one of our favorite restaurants and chalk art by us. 


What a great way to spend a Saturday and I'm sure we'll have many more like it this summer!

April 15, 2012

March & April project progress + April/ May plans

What I wanted to accomplish in March/April:

1. God's eyes
2. Starting seeds
3. Granny square bag
4. Homemade vanilla extract
5. Felt projects

How did I do?

1.

Made a bunch and completed a mobile- post to come soon!

2.

Many seeds done- lots of veggies and some flowers. I've bought more to do at some point, but all the important stuff is ready to go outside when the weather is favorable!

3.

The bag is done, but I have yet to figure out what to do for the straps, so, I'd say 80% completed.

4. Um, nope. I kept forgetting to look for vanilla beans at the grocery store, and when I finally did, they were very expensive. So, I ordered them online and hope I can do this soon.

5.

Lots of felt peacock feathers... and I put them all over a dress and made a tutorial!


So, it was a pretty successful month and here's what I want to do in the next one:


1. First, homemade vanilla extract for sure!

2. Fabric mushroom topiary:


I love the little 3 dimensional mushroom stuff I've seen on Pinterest and Etsy, so I want to make my own!


3. Move perennials:


There are huge clumps of hostas and day lilies that need to be split and ferns that are growing in the grass and will inevitably be mowed if I don't move them.


4. Mini terrarium necklace:


How cute is that? I've ordered a pendant to put mine inside and I can't wait to make it!


5. More terrariums:


Yeah, I love terrariums...


I can't wait to get everything done!

April 14, 2012

Raised garden bed tutorial.


We recently built one modest raised garden bed and have yet to plant anything in it (frost is still expected this early in the spring) but it's still a success!

Why go raised?  
1.  Your soil will retain heat better, which will extend your growing season.
2.  The higher position of your plants will allow for better drainage.
3.  You will be able to remain more upright while gardening, saving yourself some aches and pains!
3.  You can control the type of soil the plants are growing in AND it will not erode away.


Here's a little summary and description of how we did it:

First, you need to decide how big to make your garden. Length is as big as you wish (consider how much wood you can transport) but the width is pretty important- you need to be able to reach the middle of the garden easily. We opted for 6'x4'. (Those dimensions yield 24 square feet of garden!)

XxY= total square footage of your garden.


Next you need to purchase your supplies. This can be a bit challenging. You need untreated wood. Although chemical treatment of some wood has changed in recent years, consider that whatever is in the wood has the potential to leech into your plants... and your vegetables if you opt to grow edibles. Cedar is quite expensive, but lasts longer than standard untreated wood. We stuck with the cheaper stuff and figured we'd see how that holds up over the next few years.

We bought:
8 feet of 4"x4" wood for the corner posts.
*This was cut into four 2' posts at the store. Many places will cut the wood for you for free, up to a certain number of cuts.
40 feet of 2"x6" wood for the sides.
Four 6' pieces.
Four 4' pieces.
6 bags of topsoil.
6 bags of compost with manure.
1 cubic foot of peat moss.
Landscape fabric.
32 screws.


Other tools you'll need:
A drill.
A shovel.


Once you have your supplies, it's time for the physical part to get started!

Mark off the area you want to put the garden bed in. Then you need to dig out the grass and the weeds that are there. This prevents this stuff from growing up into your garden (think of it as preventative weeding) and will help your garden "sit" securely where you want it to be.


This took me a while- I wanted to shake off a lot of the dirt from the grass roots and there was a lot.

Cut your landscape fabric to fit the space. This is an extra barrier against weeds, but also helps hold your soil in.


Then, you need to assemble your bed. This is best done with two people- one to hold the wood, one to drill. I'd suggest starting with the two shorter sides. Then, those can be tipped up on their sides, and the other boards can be added.


After your bed is put together, you can move it into position. We dug 4" holes for the posts to rest in. We also left some post above the top of the bed in case we need to add fencing to keep rabbits and other critters out.

Then you can fill your bed with compost, topsoil, peat moss and whatever else. Ours didn't fill completely, but since soil and compost are relatively cheap ($1-3 a bag) you can always add more.


You're ready to plant!


Comments, questions? Let me know and I will respond as soon as possible!

April 07, 2012

White flowers, blue skies.

We went out disc golfing yesterday (well, technically I didn't play because I was sore from too much discing the rest of the week). I brought my camera, but didn't pull it out until I saw these flowers:


I'd love to know what they are. They were growing on big 6-8' bushes in a large open area. If they're non-invasive, they'd be a pretty plant to add to the yard.


April 06, 2012

The cutest darn terrarium I've ever seen.

I thrifted a cute little mushroom terrarium a few back and got around to planting it today. I had to find a tiny plant to go inside (I opted for a fern) and crawled around the yard looking for little pebbles and moss- pebbles for drainage space in the bottom and moss because I love moss.


I had this tiny deer that was my grandma's and it fit perfectly.


I found a rock with moss...


...and I dug some other tiny pieces of moss out to cover the rest of the exposed dirt.


I love my new terrarium and can't wait to see it steam up in the sun.

March 25, 2012

Everything's gone green!

Up first, a major accomplishment:


We built our raised veggie garden bed! I really intended on getting pictures of the whole process, but I was working pretty hard, so that didn't happen.

Our bed is made from 2x6 boards cut into 4- and 6-foot pieces. The corners are mounted on 4x4s cut to 2 feet apiece. We secured the corners into the ground about 4 inches deep and left the tops in case we need to put up a small fence to protect our veggies from the bunnies. Digging up the old grass was pretty time consuming. Also, we underestimated how much dirt we'd need by like, 10 bags, but we still have plenty of time before we can plant our seedlings.


Perennials coming up:


Mushrooms on a disc golf outing this morning:


Rooftop view from dinner the other night:


The patio wasn't open yet, but the upstairs dining had a large door that was open so we had a view of the Basilica and a pleasant breeze.


My pansies! First flowers of the season. Resistant to frost and oh-so-lovely. I need to find out if the blossoms from this particular variety are edible.