Showing posts with label crafts. Show all posts

April 09, 2015

The first of many vests

One of the main projects I've been indulging in over the last 10 months has been crocheting vests.  And vests.  And more vests. 


It started with a trip to a yarn shop in Seattle on our honeymoon where I bought some wooly yarn on clearance.  I didn't know what to do with it, but I decided after a few weeks that I wanted to make a vest.  Now, let me say, at this point in time I was not a super proficient crocheter (nor would I argue that now, even).  I made stuff, but I'm not a pattern reader and most of my projects involved straight lines or squares.  So, this vest thing was a whole new undertaking: CROCHETING IN THE ROUND. 


Some how I figured it out.  It wasn't immediate, but I got it.  The first attempt took a lot of ripping out stitches and reevaluating why I'd decided to pursue this type of a project.  It wasn't perfect when it was done, but I liked it and I felt proud of this new pattern I'd begun to create. 

Since, then, my pattern has evolved and been developed to the point where I can generally produce something I like on the first try.  It's faster, although still time-consuming.  I've also sold many of my creations, which feels really good.  Not for the money, but for the opportunity to have someone else appreciate my work. 

March 09, 2014

Infinity scoodie

A few months ago I had a nice break from classes, and decided to pursue a new craft project- an infinity scoodie.  I wanted to make my own pattern and after some trial and error, pulled it off!  A friend saw mine and asked for own of her own and it turned out so good.  Here are some pictures of the final result of what I made for her:


Nicole picked some colors that I wouldn't have chosen on my own, and they were so perfect!  After I started, I couldn't get over how much I loved them together.  The yarn I used is super soft and the whole piece is really comfortable to wear.


I added some details that weren't on my original, including a cord with tassels to tighten the hood and a satin liner to help give the hood shape and for more warmth.  


The scarf part is really long (it reaches the ground when hanging straight down and loops around 3-4 times.


I love this scoodie and am looking forward to making more.  If you are interested in one of your own, feel free to contact me, either through blogger or my Etsy store.  (There isn't much on my Etsy shop right now, but you can send me a message and we can consult on an item.)  Thanks!

August 22, 2013

Dreamcatcher 2.0


I just finished another dreamcatcher and this one's up for sale on Etsy!  The colors are completely different from the other one I recently made and I really like how it looks.  Check out some pictures or see it on Etsy!


And also if you're interested, all the headbands in my shop are on sale for $5 so I can get some new stock up.  Thanks!

August 17, 2013

Bridal flower crown

Recently a friend asked if I could make a headpiece for the bride from a bachelorette party that she was organizing.  She wanted a floral crown that was a little more earthy than typical party gear. She shared a few pins and pictures with me for inspiration and basically let me choose the color scheme and overall look of the piece.

The party was tonight, so now I'm free to share pictures of what I made without ruining the surprise!  (Naturally, I had to try it on to test out the fit, so bear with the pictures of me in someone else's crown.)


I usually shop at Joann's for my craft supplies (they sell most of what I need, and send me coupons through their mailing list), but for this project, I opted to get my stuff at Michael's.  I've always been hesitant of silk flowers, but since this piece needed to last, I was pretty set on trying to find some that I liked.

The wedding is coming up this fall, so I wanted this piece to be a little autumn-ish, but still summery enough for August.  I used mostly small white flowers and some orange and green ones.  I found perfect glassy looking green and orange beads that were pretty earthy, but a little fancy too.


I twisted the wrapped wire and flowers together and fastened the flowers on it pretty securely (I also took each flower off and glued them back onto their plastic stems since they have a tendency to pop off pretty easily).


I didn't know how big to make it, but since I wanted it to fit and stay on, I loop each end of the crown and braided yarn to tie the whole thing on.  The crown itself has some flexibility, so it can be bent to fit better if needed.


I'm so happy with how this turned out!  I love getting requests for projects; I feel inspired to try new things and do my best to make them work.  The bachelorette party is happening now, so I hope that the bride-to-be enjoys this crown as much as I enjoyed making it!  (In fact, I feel some inspiration for my own wedding plans!)

August 16, 2013

Summer crafting: apron top

Summer has been super busy so far, between music festivals, outdoor activities, grad school, and work, but I've still managed to complete some projects that I'd been meaning to get to!  Here's something that I whipped up this weekend:

(Gin & tonic, the ideal summer beverage)

I bought some corduroy remnants at the craft store this past winter and knew I wanted to make some sort of patchwork project, but I waited until the right inspiration struck.  After five festivals so far this year, I decided a patchwork apron top would be best for this fabric.  I considered making a dress, but my wardrobe is definitely lacking cute tops to pair with shorts.


I made the top of the shirt a little longer, with one panel of black and pink right below it.  I pleated the bust, so it's more fitted than traditional apron tops, so it looks a little less "maternity" wardrobe.  I also top-stitched everything to give it a finished look.

I can't believe how well the fabrics all go together, and they were in the same remnant bin at the same time!  I figure someone else mixed those fabrics as well.  (I also love that remnants are generally 50% their current price, meaning if it's already on sale, I get a double discount!)

The back of the top is pretty open and revealing.  I wanted it to cover a little more, but really, who cares?  It laces up, so there's some detailing over my back.


I added an applique lotus on the front of the top.  I recently bought a different brand of fusible webbing than I'd usually used, and it's a little trickier to apply.  It stuck to the front of the appliques and looked bad, so I had to double up on the layers of my lotus.


I love how this project turned out!  It was just my second totally from scratch, no pattern, homemade clothing item, so I'm pretty proud of the results.  Summer may be almost over, but I'm sure I'll have a few opportunities to wear this before autumn starts to roll in!


July 25, 2013

Dreamcatcher: Crocheter's interpretation


I decided to make a dream catcher a month or so ago.  Well, it was actually a project I'd had in my mind for awhile, I just wasn't sure how to execute it.  I'd found many inspirations on Pinterest, ranging from traditional to interpretive with vintage doilies.  I decided to just go for it and picked up an embroidery hoop from the thrift store for a few dollars and some yarn (I threw away the package, so I need to go back to the store to find out the exact color).

First I wrapped the whole hoop in hemp.  It took forever because I wanted it tight so you couldn't see wood through gaps. 


Then I went to work on my center piece.  I've done very little crocheting in the round.  Like, a few hats and some tiny flowers.  I did it all by guess-work and figured that once it was stretched on the hoop it would be alright.  After a few rounds I wove in two layers of hemp and then crocheted three more.  This was the hardest part.  I think I took it apart a few times when the hemp was too loose or tight.

Then I stretched the whole thing with hemp as tightly as possible and bound it to the hoop.  


I made a whole bunch of stuff to hang from the bottom of my dreamcatcher.  I crocheted chains and made braids and tassels from hemp and yarn and strung them through the hemp on the hoop. I wanted to add feathers, but decided even though that's a traditional dreamcatcher feature, they might be overkill on my interpretation.


I added a chain on the top to hang the piece from and it was done!  This was one of my favorite projects in a while.  It was challenging because I had no idea what I was doing, but I practiced some new skills, took my time, and wound up with something that I love to have hanging on my wall!


April 28, 2013

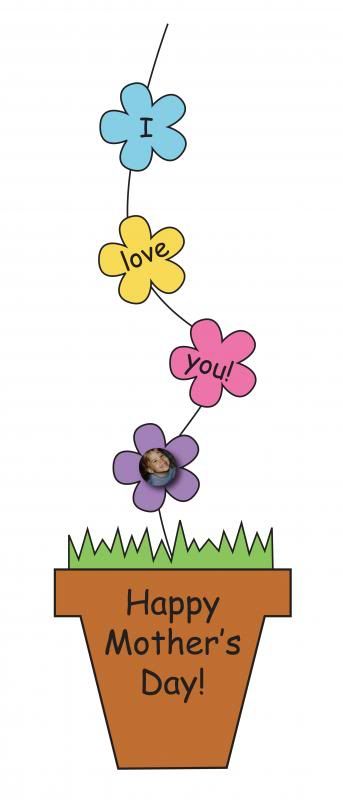
DIY Revisited: Mother's Day flower pot with template


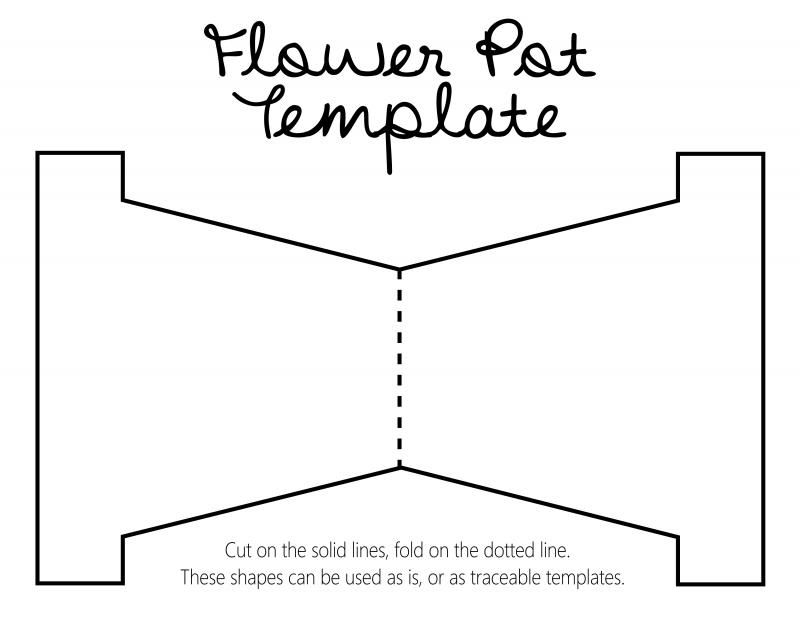
Last year I wrote a post with an idea for a Mother's Day card that I like to do at school with my kids each year. This year I decided to make a template to speed up the process!


Here are your options for different ways to use the pattern:

1. Print the pages and either use them as is.  You can let kids cut and color the pieces, but normal printer paper will be more on the flimsy side.
2. Photocopy them onto construction paper.  This is what I'm doing at work, we have a heavy duty printer that will take construction paper without a problem.  Then I let the kids to the cutting and help them put all the pieces together.
3. Cut out the pieces and and use them to trace the shapes onto construction paper.  Then let the kids cut their pieces and finish the project.

Click here to download the PDF.


Hope this helps make this project easier some of you out there!  If you want more information and details on putting the card together, go to my original post.  Happy (almost) Mother's Day!

April 21, 2013

What I've been up to lately

I'm really not getting better at regular posting lately, but in my own defense, things have been crazy busy... we got engaged, I'm finishing up my last class in my graphic design program (which happens to be character animation and is not my forte), and I was just in my first craft show! 

Being my first show, I had a lot to do other than making product (which I spent a lot of time on).  I ordered business cards, made tags for my merch, and made displays for my stuff (with Mark as the construction implementer).  It all got done, and looked great for the show!


My table display was made almost entirely from stuff we had at home.  Mark made display boards and a headband rack with wood from his shop and I covered them with fabric I already had.  I bought three cheap necklace holders at thrift stores for $1-2 apiece to hang other headbands on.  Everything else (fabric on the table, boxes, the actual tables, etc.) was stuff we had!  Oh yeah, and I made the KareWares bunting which is a bit hard to read in the photo.  I loved my booth.  It looked unique and really stood out in the room!


 I designed my business cards, printed through Vistaprint and they turned out great!


I made tags with photo paper I was never going to use (home printers can be such a pain), label tape my dad gave me, and a stamp with my logo, also from Vistaprint. 

The show went... well, ok.  The overall turnout was actually quite poor and there were other vendors who didn't sell anything.  I reached my goal of making back what the table space cost, plus some, so I felt somewhat satisfied (although business could have been better).  I think I could have done better in a more urban, well-advertised fair, but those do generally cost more to enter.  And what's with craft shows having mostly non-craft vendors?  Oh well, now I know and am prepared to enter another show when the time comes!  Again, thanks to Mark for building my stuff and keeping me company during the long day, and to friends and family for stopping by to say hello or pick up a craft!

April 05, 2013

Craft show preparation

As I get ready for my first craft show that's just a week away (eek!) I realize how much there actually is to do that I wouldn't have otherwise thought of... processing payments, tagging, displays, branding, etc.

Here are a few of the things I've been able to accomplish so far:

Payments:  I ordered a Square.  It's free to recieve and when you process payments by credit card  they only take 2.75% of the purchase total.  That seems worth it to me for sales that I might otherwise lose if people aren't carrying cash.  It hooks up to your iPad or smartphone and the app processes
payments straight to your bank account.

Branding: I have a few other things in the works, but my business cards were my first plan.  I designed them, printed through Vistaprint, and they turned out great!  I wasn't sure how the color would compare to my computer screen, but it's pretty spot-on.  I'll throw them in bags with sold items and place some on my table.


Tagging:  After I ordered the cards, I got a coupon from Vistaprint in my email.  I ordered a stamp for  creating tags and after discounts, it was $3.99+ shipping!  I stamped it on some Scotch brand label tape my dad got for my birthday (he works for 3M).  I used old photo paper that we were never going to print on for the tags and put them with my stuff!


I'll hopefully be sharing more of my progress over the next week, including display plans and the banner for my table!

April 01, 2013

Little projects

I've been crafting like crazy lately, getting things ready for my first craft show!  Our house seems to be overtaken with my supplies... sewing machine on the table, piles of fabric across the living room floor, yarn everywhere. I will be a relieved when the show has come and gone, and I know I made things I genuinely liked.  Some of my favorite things to make are these little brooches and hair clips with flowers and embroidery. 

Here are a few of my favorites:


Some are felt and beads, some have little crocheted flowers I whipped up.   It's nice being able to have variation between pieces by changing things slightly.


 Well, back to work.  I'm very excited and nervous about the show, so hoping it goes well!  (I may have had a nightmare that I didn't sell anything, so here's to hoping I sell at least one or two things!)

March 10, 2013

Thrift store fabric score!

I generally shy away from bundles of fabric at the thrift store; they're bagged up with a bunch of different prints and colors and I usually only want one out of the lot.  So, I skip on buying the whole bag for just one fabric (even though they're still cheaper than the craft store... but with the bags you never know how much you're getting or in what condition).  However, when I was thrifting a few weeks back, I couldn't resist this $4 bag of awesome cloth!


(The gray, yellow, orange, and olive floral print was actually a separate purchase, but within the same day, so I threw it into the pictures.  Oh, and the spotty stuff on the right isn't my thing, but I'm holding onto it for the time-being to see if inspiration strikes.)

I opened up the bag when I got home, and much to my excitement, found nearly ten yards of uncut, perfect fabric, some still with the original labels!  The fabric was old, but beautiful and some had incredible texture! 


I started lining up the fabrics to see what would go together and came up with a few combinations for whatever I decide to sew.  I like the orange with both of the prints below (but may make the argyle print into some cute high-waisted shorts). 


 The green print and the purple go together nicely.


And because I love this one so much, I still need to include it in the post.  I did buy it separately, but it's so awesome I can't wait to plan sewing something from it.  I'm thinking some pants... or something!  


So yay for buying my first grab bag of cloth at the thrift store!  I consider this purchase a major success and have already started sewing with some of it.  I've even bought another bag with similar success since!  Can't wait to show some of the projects that come out of a few dollars!

March 09, 2013

Super easy DIY bobby pin saver


For years I've been dealing with a problem women all over the world struggle with:  where the heck did all my bobby pins go?!  It seems like I buy those huge packs a few times a year and then can't find any hair pins when I really need them.  I clean my house, expecting to hit a jackpot, but no such luck.  Where did all my bobby pins go??

I decided to figure out a solution with things I had around the house and am sharing what I came up with.  It's very easy and you may already have the supplies around your own home!


1.  First, gather your supplies:
     -A photo frame without the glass (mine was 8"x10", but smaller would work)
     -Fabric slightly larger than your frame
     -Magnetic tape
     -Scissors
     -Multi-surface adhesive (I used Scotch Maximum Strength Adhesive)

2.  Take your frame apart and cut your magnetic tape to fit the backing piece.  Double check that the piece will fit in the frame with this attached.  If not, cut it a little shorter.

3.  Cut more pieces of tape.  I used 6.

4.  Peel the backing from your tape and mount it on the backing.  If it doesn't stick well, use a little of your adhesive.

5.  Cut your fabric a little larger than your backing piece.  I left an inch of fabric on each edge.  Double check that the bobby pins stick with the fabric over the magnets.  If they don't, you may need thinner fabric or stronger magnets. 

6.  Wrap the fabric over the piece and glue on the back.

7.  Put your backing piece back in the frame.

8.  Hang and never spend your mornings looking for bobby pins again!


Hope this is an easy solution for others!  I'm pretty proud of this project and hope that it will be a while until I need to buy more bobby pins (I just have to remember to actually stick them up there!)  Good luck with this little project!

February 25, 2013

Granny bunting 2.0: final results

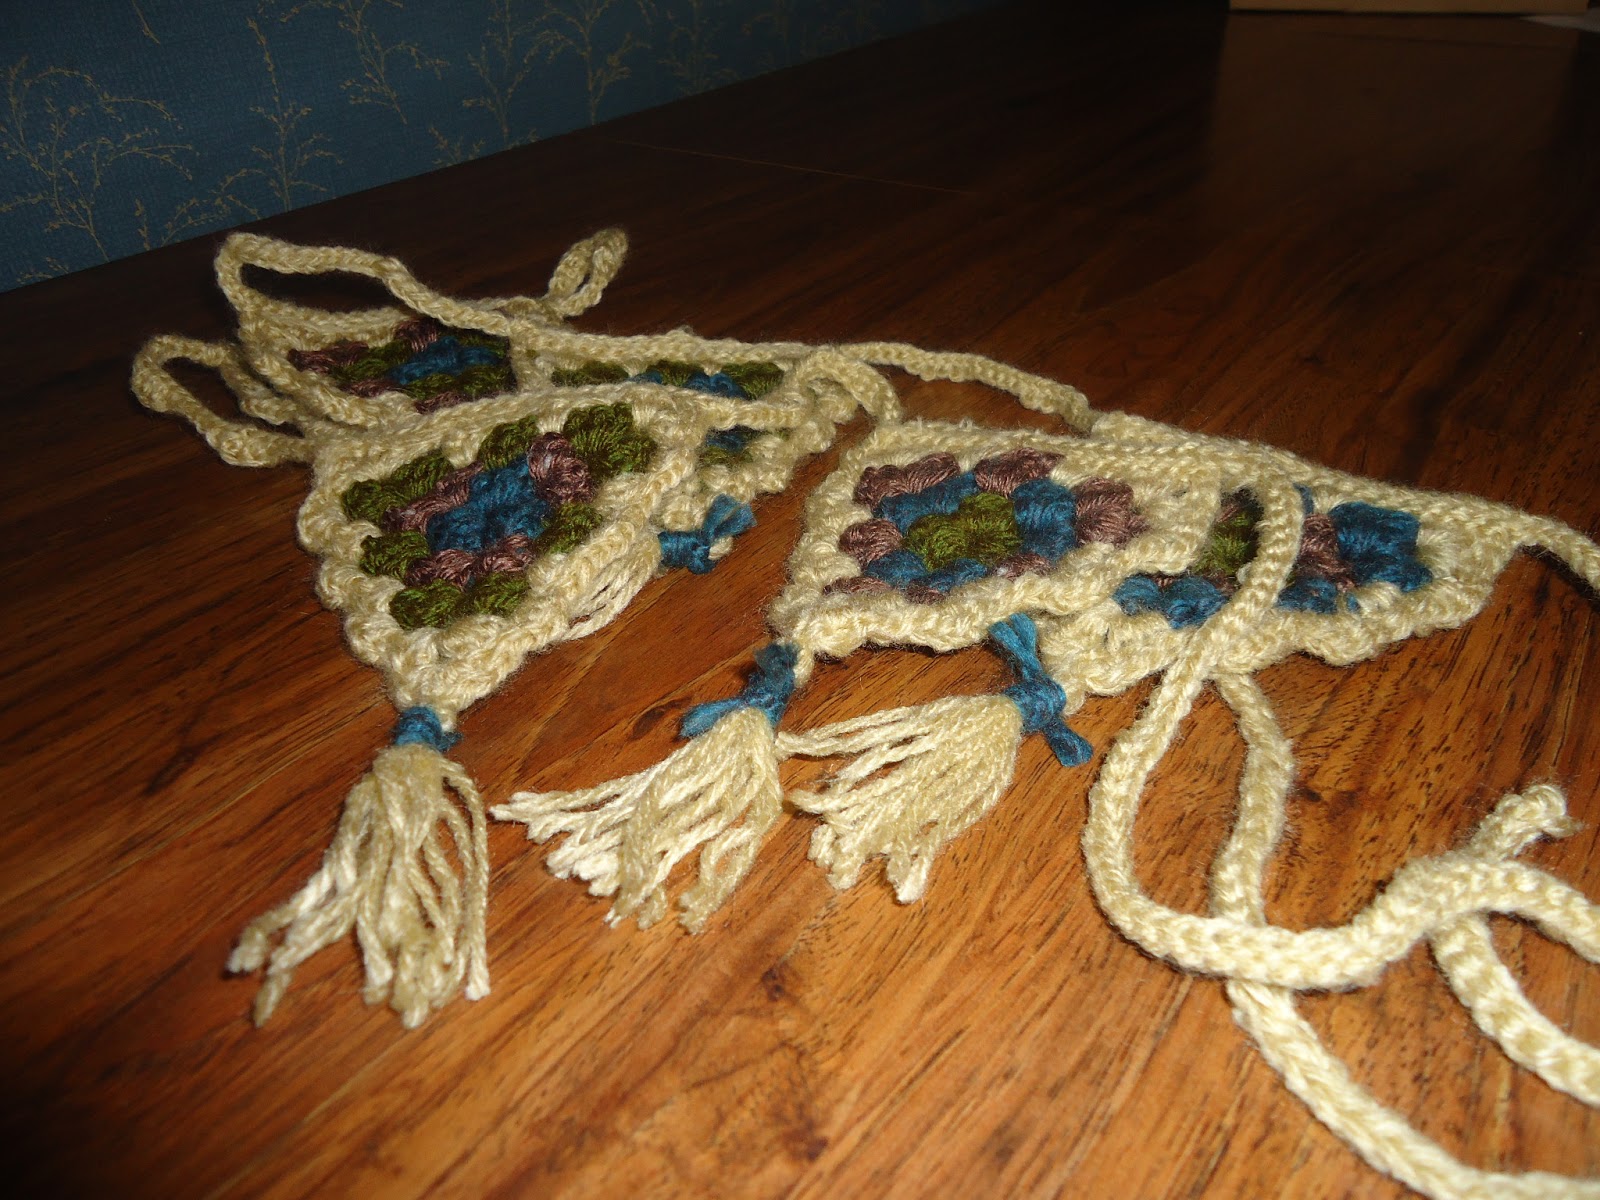
About three months ago I was working on a little project with "granny triangles" to make bunting for a friend as a Christmas gift.  I finished it probably a day or two after my first post about the project, took some pictures, gave it to my pal, and then didn't think about it for a while. 

I revisited those pictures today and decided it was about time I posted them.   Besides, I loved this project!  The colors were very cute together and the result (unlike my first bunting attempt with insanely fuzzy yarn that doesn't show stitches) is tidy and delicate.


I usually steer away from white, well... everything, but I had this super soft yarn that a friend didn't want, so I gave it a shot.  It's nice and I managed to keep it looking lovely until gift-swapping time.  The other colors were left from other past projects.  And yes, I used three different sized yarns, but it didn't seem to affect spacing or size of each triangle. 


Hanging in our dining room for a few pictures.  Oh, look at the lovely wall paper a previous owner hung.  It's like a Tommy Bahama shirt exploded on the walls. 


I especially love the scalloped edges I added around the triangles and on the chain they hang on.  I used this technique on another recent project.  I think it adds a great finished look.  The tassels really add a nice touch as well.  I'd definitely make a similar project again (maybe for myself or another friend) and maybe try to write a simple pattern if anyone is interested in making their own! 


I'm excited I've been getting around to sharing some of my recent projects.  I need to get back in a habit of blogging, especially because I have so much to share.  Hope to be back again soon!