Showing posts with label crocheting. Show all posts

April 09, 2015

The first of many vests

One of the main projects I've been indulging in over the last 10 months has been crocheting vests.  And vests.  And more vests. 


It started with a trip to a yarn shop in Seattle on our honeymoon where I bought some wooly yarn on clearance.  I didn't know what to do with it, but I decided after a few weeks that I wanted to make a vest.  Now, let me say, at this point in time I was not a super proficient crocheter (nor would I argue that now, even).  I made stuff, but I'm not a pattern reader and most of my projects involved straight lines or squares.  So, this vest thing was a whole new undertaking: CROCHETING IN THE ROUND. 


Some how I figured it out.  It wasn't immediate, but I got it.  The first attempt took a lot of ripping out stitches and reevaluating why I'd decided to pursue this type of a project.  It wasn't perfect when it was done, but I liked it and I felt proud of this new pattern I'd begun to create. 

Since, then, my pattern has evolved and been developed to the point where I can generally produce something I like on the first try.  It's faster, although still time-consuming.  I've also sold many of my creations, which feels really good.  Not for the money, but for the opportunity to have someone else appreciate my work. 

March 09, 2014

Infinity scoodie

A few months ago I had a nice break from classes, and decided to pursue a new craft project- an infinity scoodie.  I wanted to make my own pattern and after some trial and error, pulled it off!  A friend saw mine and asked for own of her own and it turned out so good.  Here are some pictures of the final result of what I made for her:


Nicole picked some colors that I wouldn't have chosen on my own, and they were so perfect!  After I started, I couldn't get over how much I loved them together.  The yarn I used is super soft and the whole piece is really comfortable to wear.


I added some details that weren't on my original, including a cord with tassels to tighten the hood and a satin liner to help give the hood shape and for more warmth.  


The scarf part is really long (it reaches the ground when hanging straight down and loops around 3-4 times.


I love this scoodie and am looking forward to making more.  If you are interested in one of your own, feel free to contact me, either through blogger or my Etsy store.  (There isn't much on my Etsy shop right now, but you can send me a message and we can consult on an item.)  Thanks!

August 22, 2013

Dreamcatcher 2.0


I just finished another dreamcatcher and this one's up for sale on Etsy!  The colors are completely different from the other one I recently made and I really like how it looks.  Check out some pictures or see it on Etsy!


And also if you're interested, all the headbands in my shop are on sale for $5 so I can get some new stock up.  Thanks!

July 25, 2013

Dreamcatcher: Crocheter's interpretation


I decided to make a dream catcher a month or so ago.  Well, it was actually a project I'd had in my mind for awhile, I just wasn't sure how to execute it.  I'd found many inspirations on Pinterest, ranging from traditional to interpretive with vintage doilies.  I decided to just go for it and picked up an embroidery hoop from the thrift store for a few dollars and some yarn (I threw away the package, so I need to go back to the store to find out the exact color).

First I wrapped the whole hoop in hemp.  It took forever because I wanted it tight so you couldn't see wood through gaps. 


Then I went to work on my center piece.  I've done very little crocheting in the round.  Like, a few hats and some tiny flowers.  I did it all by guess-work and figured that once it was stretched on the hoop it would be alright.  After a few rounds I wove in two layers of hemp and then crocheted three more.  This was the hardest part.  I think I took it apart a few times when the hemp was too loose or tight.

Then I stretched the whole thing with hemp as tightly as possible and bound it to the hoop.  


I made a whole bunch of stuff to hang from the bottom of my dreamcatcher.  I crocheted chains and made braids and tassels from hemp and yarn and strung them through the hemp on the hoop. I wanted to add feathers, but decided even though that's a traditional dreamcatcher feature, they might be overkill on my interpretation.


I added a chain on the top to hang the piece from and it was done!  This was one of my favorite projects in a while.  It was challenging because I had no idea what I was doing, but I practiced some new skills, took my time, and wound up with something that I love to have hanging on my wall!


June 16, 2013

Weekend exploring

I haven't been posting much lately.  Things have been busy, more on that another time.  But anyways, this weekend we went for a bike ride to the farmer's market and saw this:


I've seen lots of yarn-bombing, but never anything quite as intricate (except in pictures).  It was tucked away off a bike trail in the woods, near a little rest area.  It made my heart smile.  I hope I see more great work like this over the summer!


<3

April 21, 2013

What I've been up to lately

I'm really not getting better at regular posting lately, but in my own defense, things have been crazy busy... we got engaged, I'm finishing up my last class in my graphic design program (which happens to be character animation and is not my forte), and I was just in my first craft show! 

Being my first show, I had a lot to do other than making product (which I spent a lot of time on).  I ordered business cards, made tags for my merch, and made displays for my stuff (with Mark as the construction implementer).  It all got done, and looked great for the show!


My table display was made almost entirely from stuff we had at home.  Mark made display boards and a headband rack with wood from his shop and I covered them with fabric I already had.  I bought three cheap necklace holders at thrift stores for $1-2 apiece to hang other headbands on.  Everything else (fabric on the table, boxes, the actual tables, etc.) was stuff we had!  Oh yeah, and I made the KareWares bunting which is a bit hard to read in the photo.  I loved my booth.  It looked unique and really stood out in the room!


 I designed my business cards, printed through Vistaprint and they turned out great!


I made tags with photo paper I was never going to use (home printers can be such a pain), label tape my dad gave me, and a stamp with my logo, also from Vistaprint. 

The show went... well, ok.  The overall turnout was actually quite poor and there were other vendors who didn't sell anything.  I reached my goal of making back what the table space cost, plus some, so I felt somewhat satisfied (although business could have been better).  I think I could have done better in a more urban, well-advertised fair, but those do generally cost more to enter.  And what's with craft shows having mostly non-craft vendors?  Oh well, now I know and am prepared to enter another show when the time comes!  Again, thanks to Mark for building my stuff and keeping me company during the long day, and to friends and family for stopping by to say hello or pick up a craft!

April 01, 2013

Little projects

I've been crafting like crazy lately, getting things ready for my first craft show!  Our house seems to be overtaken with my supplies... sewing machine on the table, piles of fabric across the living room floor, yarn everywhere. I will be a relieved when the show has come and gone, and I know I made things I genuinely liked.  Some of my favorite things to make are these little brooches and hair clips with flowers and embroidery. 

Here are a few of my favorites:


Some are felt and beads, some have little crocheted flowers I whipped up.   It's nice being able to have variation between pieces by changing things slightly.


 Well, back to work.  I'm very excited and nervous about the show, so hoping it goes well!  (I may have had a nightmare that I didn't sell anything, so here's to hoping I sell at least one or two things!)

February 25, 2013

Granny bunting 2.0: final results

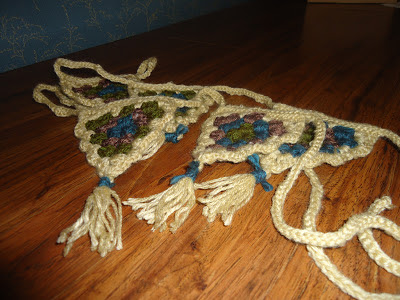
About three months ago I was working on a little project with "granny triangles" to make bunting for a friend as a Christmas gift.  I finished it probably a day or two after my first post about the project, took some pictures, gave it to my pal, and then didn't think about it for a while. 

I revisited those pictures today and decided it was about time I posted them.   Besides, I loved this project!  The colors were very cute together and the result (unlike my first bunting attempt with insanely fuzzy yarn that doesn't show stitches) is tidy and delicate.


I usually steer away from white, well... everything, but I had this super soft yarn that a friend didn't want, so I gave it a shot.  It's nice and I managed to keep it looking lovely until gift-swapping time.  The other colors were left from other past projects.  And yes, I used three different sized yarns, but it didn't seem to affect spacing or size of each triangle. 


Hanging in our dining room for a few pictures.  Oh, look at the lovely wall paper a previous owner hung.  It's like a Tommy Bahama shirt exploded on the walls. 


I especially love the scalloped edges I added around the triangles and on the chain they hang on.  I used this technique on another recent project.  I think it adds a great finished look.  The tassels really add a nice touch as well.  I'd definitely make a similar project again (maybe for myself or another friend) and maybe try to write a simple pattern if anyone is interested in making their own! 


I'm excited I've been getting around to sharing some of my recent projects.  I need to get back in a habit of blogging, especially because I have so much to share.  Hope to be back again soon!

February 24, 2013

A weekend project

Oh, I must be just about the worst blogger ever. It's been, what... a month or so? Well, in my defense, my computer is on it's way out and I haven't been able to edit photos at all. Hoping to remedy the situation soon though!

In the meantime, I've done many projects that I hope to show soon. Here's what I made this weekend:


(Forgive the iPad at night picture quality)

Wrist warmers with flowers to get me through the last of winter!  I bought the green yarn for a project I was working on, but it wasn't the right color (serves me right for not saving my yarn labels).   I loved the color and super soft texture, so I kept it for other projects.  I made up this pattern as I went, but I think I remember it well enough to make another similar project again soon.  The flowers were made from scraps of yarn and buttons lying around.  A cozy, simple, comfy weekend project.  I can't wait to wear these out soon!  

November 11, 2012

Granny bunting: take 2

So, we had a potluck last night and a bunch of people came, so I had to show off my craft room to our guests.  A friend who was there commented on my granny bunting and how she'd love to hang some in her home.  And boom!  Perfect Christmas gift idea! 


I got to work right away today, and I definitely love my results so far.  I used more standard yarn so the stitches are more defined.  Then I figured out how to edge the triangles with scallops, which really gives them a polished look. 


I can't wait to finish these and give them to my friend at Christmas.  I'm thinking of keeping the whole thing shorter- maybe only five pendants, so it's simple and hang-able in more spaces.  Then, I'll definitely be making more for our own house!

October 28, 2012

Granny bunting for my craft room

I've been intending to make granny bunting for, well, months and months, but the summer was so busy I only recently got to attack this project.  I followed this pattern very loosely.   I used a very thick fuzzy yarn, so it didn't work unless I added some chain stitches here and there.


I used three colors (they were unlabeled and from a garage sale): red, deep pink, and pale pink.  I have so much of this yarn, but realized I'm not very good at working with it, so I wanted to dip into my supply.  That was literally the only reason I choose this yarn and the colors.  The bunting is pretty, you just can't see much contrast between the colors and the individual stitches don't stand out very well.  


HOWEVER, I do think it turned out cute.  It's hanging in my craft room from the wall to the light fixture.  It adds some depth to the room, and I usually don't hang things from the ceiling area (mostly because I can't reach that high, even with a step stool. 

This was a fun, easy project to occupy some time.  I'd like to make another version with better yarn to hang in a more visible spot in the house.  

October 01, 2012

Accessorizing our craft room.

After I organized, it was time to decorate the room!  Almost nothing was purchased for this space- most things I already owned and some I refurbished, the rest were thrifted. 


The big picture in the middle was thrifted a few years ago for $2.50.  It's also identical to a picture hanging in the kitchen of the set of Malcolm in the Middle!  I noticed that during a marathon this past winter.  The framed leaves were maybe from Target, but I can't remember. 

I whittled down my button collection to make this heart on a fabric covered board.  I added a stack of movies, although, these will likely change depending on my mood. 
I repainted this little shelf with spray paint (it used to be navy) and put up some little knick-knacks.  I love this picture of the girl and her kitten; it says "Friendly thoughts keep hearts in touch."  39 cents!
This pincushion was my grandma's, along with the brown pitcher in the bottom right corner.  The little animals are from the antique mall.  I planned on putting them in a terrarium, but might leave them here for now.  Little craft bottles for whatever.  Oh, and the vase; it matches the tablecloth you'll see in a minute, so I had to add it to the arrangement.


Another shelf I repainted.  And yes, those are kittens having a tea party.  My mother knows me so well!

I wanted to add a few plants, so I put some clippings I'm trying to root in vases.  The hanging one is rosemary (smells great!) in a little glass bottle with tiny blue beads in the bottom.  The orange vases from Ikea are wrapped in hemp and beads.


The table cloth I'm using was $2 at the thrift store.  I really wanted something to put over the old plastic table top, and something that would be easy to clean if I accidentally splashed paint.  As much as I used giggle at my grandma's old vinyl cloths, I knew that's what I needed.  I really lucked out when I found this one- the print is perfect!

So there's the craft room!  There are a few other details I wasn't able to get good pictures of or have since added, but this is most of it!  I hope it gives people some ideas for how to decorate and arrange their own space on a budget!  I learned that it may take time to create a new space, and it may not be perfect right away, but that's alright!  I mean, I might as well use the craft room to create things for that space!

August 25, 2012

Craft room organization

After the walls were painted and the furniture was moved in, it was time for me to organize my supplies.  Once again, I opted to use things I already had to make the space my own.  I mean, our own.


I sorted through my supplies and made sure everything had some sort of space or organization.  Well, I tried at least.  Thread, needles, pins, etc. went in the antique sewing box my grandma gave me.  Felt into a $5 sewing basket from Goodwill, complete with vintage fabric lining and built-in pincushions.  Yarn in the basket my aunt made. I tied together a stack of fabric scraps.
Since I'd already filled up my table space, I stacked up boxes and baskets between my desks and garbage can.  The gray travel case was another heirloom from my grandma.  It's filled with odds and ends, like old jewelry I plan on cutting up.  The bottom box is beads and wire.  


I used an old plastic crate as a tabletop shelf for craft books, sketch pads, and canvases.

After moving from my apartment, I hung onto a Hello Kitty toothbrush holder that's perfect for scissors and crochet hooks.  Colored pencils in a jar from Toby Keith's I Love This Bar (don't ask... it was a truly painful experience).  I got that adorable little crayon box at the thrift store for $2.
So, there's my initial organization of the craft room!  There's sure to be more as I find more things that belong in the room and I've already decided on a few things to change.  How do you organize your crafts?  Are there any things you struggle with finding a good space for?