Showing posts with label how to. Show all posts

April 28, 2013

DIY Revisited: Mother's Day flower pot with template


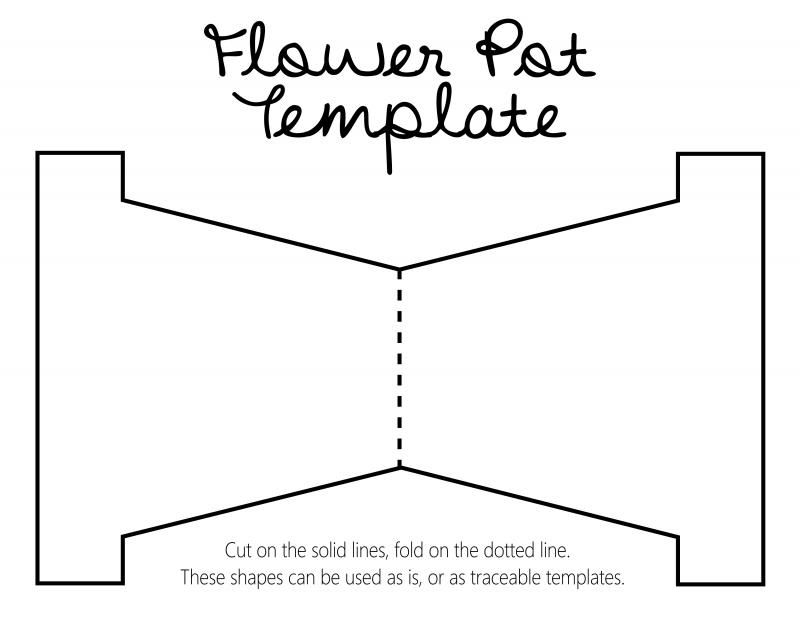
Last year I wrote a post with an idea for a Mother's Day card that I like to do at school with my kids each year. This year I decided to make a template to speed up the process!


Here are your options for different ways to use the pattern:

1. Print the pages and either use them as is.  You can let kids cut and color the pieces, but normal printer paper will be more on the flimsy side.
2. Photocopy them onto construction paper.  This is what I'm doing at work, we have a heavy duty printer that will take construction paper without a problem.  Then I let the kids to the cutting and help them put all the pieces together.
3. Cut out the pieces and and use them to trace the shapes onto construction paper.  Then let the kids cut their pieces and finish the project.

Click here to download the PDF.


Hope this helps make this project easier some of you out there!  If you want more information and details on putting the card together, go to my original post.  Happy (almost) Mother's Day!

March 09, 2013

Super easy DIY bobby pin saver


For years I've been dealing with a problem women all over the world struggle with:  where the heck did all my bobby pins go?!  It seems like I buy those huge packs a few times a year and then can't find any hair pins when I really need them.  I clean my house, expecting to hit a jackpot, but no such luck.  Where did all my bobby pins go??

I decided to figure out a solution with things I had around the house and am sharing what I came up with.  It's very easy and you may already have the supplies around your own home!


1.  First, gather your supplies:
     -A photo frame without the glass (mine was 8"x10", but smaller would work)
     -Fabric slightly larger than your frame
     -Magnetic tape
     -Scissors
     -Multi-surface adhesive (I used Scotch Maximum Strength Adhesive)

2.  Take your frame apart and cut your magnetic tape to fit the backing piece.  Double check that the piece will fit in the frame with this attached.  If not, cut it a little shorter.

3.  Cut more pieces of tape.  I used 6.

4.  Peel the backing from your tape and mount it on the backing.  If it doesn't stick well, use a little of your adhesive.

5.  Cut your fabric a little larger than your backing piece.  I left an inch of fabric on each edge.  Double check that the bobby pins stick with the fabric over the magnets.  If they don't, you may need thinner fabric or stronger magnets. 

6.  Wrap the fabric over the piece and glue on the back.

7.  Put your backing piece back in the frame.

8.  Hang and never spend your mornings looking for bobby pins again!


Hope this is an easy solution for others!  I'm pretty proud of this project and hope that it will be a while until I need to buy more bobby pins (I just have to remember to actually stick them up there!)  Good luck with this little project!

November 17, 2012

DIY t-shirt plant hanger


The kitties have been very naughty lately, chewing on and uprooting houseplants that we have sitting out everywhere.  Then they throw up, and nobody needs that.  I have a bunch of hemp and yarn hangers that I made in the past, but not enough to hold the plants that need to be up.  They're pretty time consuming to make, so I wanted to do something else to protect my plants and animals.  This project only took me about half an hour!

I found this tutorial on Pinterest and modified it to fit my needs.  Here's a simple rundown of what I did:

1.  Found an old t-shirt, mine was tie-dyed, men's size small.

2.  Cut horizontally across the torso region to make 6 inch wide loops.

3.  Cut the loops on one end so you have 6 fabric strips, each about 2 feet long.

4. Fold the strips in half and knot several inches below the fold to make a loop.

5.  Divide the strips into four groups of three.  Braid each of these groups about halfway.  Knot each braid.

6.  Split the braids.  Two strands will go left.  One will go right.


7.  Moving circularly from the top knot, tie sections of three a few inches down, combining half the pieces from two braids.  I know this sounds confusing, but looking at the photo here on the right shows the split braids Always move in a circle as you do this so the strands don't get tangled and confused.

8.  A  few inches below these knots, make one large knot combining all the strands.  Trim any uneven ends.  

Add your plant and hang!  My pot is 4 inches, pretty small, but this size seems perfect for the hanger.  A larger shirt would yield a larger hanger. 


Hope the directions and illustrations help anyone who'd like to try this simple DIY!

November 01, 2012

Halloween 2012: Owl style


For Halloween I decided to break in my new-ish sewing machine and lose my typical cat costume.  (Seriously, for at least ten years I've always been a cat, with the very occasional crayon or raver costume thrown in there.)  I did a little research on Pinterest and found this, which led me to this (for the dress) and this (for the wings).  I was sold... I had to be an owl!


The blogs I read suggested using scrap fabric for feathers, but since I haven't sewn much yet and tend to use every little piece of fabric when I do, I needed to purchase my material.  I relied mostly on remnants and a few yards of discount fabric.


The solid colors were remnants on sale between $1-2.  The prints (which I absolutely love!) were each on sale for $2/yard.  I got a yard of each.  I did purchase more than you see in the picture because I realized it wasn't quite enough.  My grand total for the feather fabric was around $10 for about 3.5 yards.  I had just enough to cover the costume. 

The biggest expense for the project was the least exciting, but most necessary part: the plain black base fabric for the wings.  I needed 4 yards, and at $4/yard, it cost $16 plus another $5 for bias tape for edging.  I doubled the layers of the backing to cover up my stitching (I guessed it wouldn't be particularly pretty, I assumed correctly), so it looked good, but also helped keep me warm in the 40-degree weather!


To make my feathers I cut a paper sample, about 4"x4", like this:


I added a little point on my feathers.  Then I got cutting.  Initially I was being oh-so-careful about cutting the edges perfect and smooth, but when I realized how many feathers I'd need, I just started layering the fabric and chopping away three or four at a time. I cut them like a puzzle so I wouldn't waste any fabric:


After I cut them all (around 350 feathers), it was time to sew!  I divided the feathers three ways, with a few extra for the dress, laid them out just to make sure I had enough.  Then I started sewing in layers, beginning at the bottom of each piece.  As you can see, the wings were quarter circles, long enough to reach my hands from the middle of my upper back.  The dress was a bathing suit cover up I already had. 


After all the sewing was complete, I added a tie around the neck with feathers and velcro wrist straps to hold my wings on.  I also made a headpiece with felt, feathers, ribbon, and a wire hanger for shape. 

I absolutely loved how my costume turned out!  I wore iridescent mint eyeshadow with feathery eyeliner on the corners of my eyes, leggings, warm boots, and extra feathers in my hair.  I was comfortable, warm, and definitely in one of the more unique outfits of the evening!   I just wish Halloween lasted longer so I could wear this outfit more!  Oh, well, there's always next year!


June 30, 2012

DIY Floral plugs

I'm an avid Etsy surfer.  I'll buy things occasionally, but am definitely more of an online window shopper.  I'd been looking around for some fun new gauged earrings that would be less obvious than what I typically wear, and when I saw many sellers offering flower-adorned ones, they seemed perfect.  Well, perfect except for the price.

So I went to my local bead shop, found a couple of those resin flowers, and made some myself for less than $1.  Here's how I did it!


1.  Found a pair of old plugs I don't wear anymore.  You may have some earrings you can use sitting around, otherwise BodyCandy has a large selection of $1.99 plugs.  The ones I used were metal, but plastic would work just as well, if not better since it's lighter weight.  I'd also not recommend flared styles, as you will want to be able to push the plugs completely into your ear once you've attached the flowers.

2.  Went to the bead shop.  I found the flowers pretty easily and in a variety of colors.  The circular backs fit the end of my plugs quite closely, so less than $1 later, I was on my home.   My ears are a 2 gauge, so if yours are much larger it may be more difficult to find flowers that will cover the plugs completely.  Here are some similar ones online for $0.64 a piece. 

3.  Glued them together.  I used Gorilla Glue because it was what we had lying around the house.  I did it late at night, and went to sleep immediately after.  The flowers shifted a bit and don't sit perfectly flat on the plugs, but it still works for me! 


4.  Wear your new plugs!  You'll probably want to use O-rings to hold them in.  I love mine and will probably make more when I buy some supplies.


Good luck crafting!


June 10, 2012

Furniture rehab: wicker plant stand


Now that I'm moving, I've been trying to choose what furniture comes with me to the house.   There are a few un-salvageable items, like my parents' old couch that's been moved between houses and apartments over and over for the last 20-some years, but a few things I want to fix and continue to use because they're practical and not beyond repair.

So, up first, this:


A wicker and wire plant stand.  My mom picked it up for me a few years ago at a garage sale, but between the cats and whatever else, the wicker is pretty much done for (the sea foam green paint job isn't my favorite either).  

So, first I cut off the wicker.  It was a bit messy and time-consuming.  I found this tray at JoAnn Fabric's for a few dollars.  The intention was to turn it upside down and use it as the top of the table, but it wasn't quite big enough, so I decided to leave it upright.  Plus you can still see the pretty design inside!


 Next, I spray painted each with bright lime/olive-ish green color. 


Then I cut some fabric I had lying around into 1/2" wide strips and sewed the ends together so I had one long piece.  Then I wove around the original wiring.  I had to add a few extra strips of fabric vertically on the sides, where there weren't any wire warps to weave over.  (Forgive my terminology, I'm not exactly up on my weaving language.)  This is what it looked like as I worked:


And here's how it looked after the weaving:


The fabric doesn't technically match the paint at all, but I think they work alright together.  I was too darn impatient to go to the fabric store and then start weaving, so I just grabbed what fabric I had the most of (although it was only slightly larger than a quarter yard, it was the perfect amount for this!).

With the tray:


Now it sits on the porch with a plant on top!  Plus, the tray sits just slightly inside the wire, so it's pretty secure, but I can still take it off to clean it out if need be, and then the taut fabric works as a little table!


Perfect starter project as I move my furniture over to the house.  I have more ambitious plans on my list, and one that I will need to be much more intentional about, rather than just doing whatever I want, so I hope they turn out as well, or better, than this!


May 05, 2012

DIY Mother's Day flower pot card


Every year I make these cute flower pot Mother's Day cards with my students, and I adore how they turn out, so I thought I'd share how we make them!

Materials you need:
Construction paper
Scissors
Glue
Yarn or embroidery thread
Marker
Picture of child
(*UPDATE* Printable template available here.)


I cut the flowers differently every year- once with a die-cut, another time by hand (4 flowers/ student x 40 students= major time suck!), and this year with a scrap-booking punch.


I love seeing this part with kids' handwriting- very cute!


**You can use tape or staples instead of glue for a faster process.  When I made these with my class this past week I used staples to attach the string to the pot and close the sides of the pot.  I used tape to attach the flowers and string together.  No mess and no dry time so we could send them home with the kids an hour later! **


Put the flowers in the pot "envelope" so mom can pull them out.


And your card is ready!  Cute, unique, and interactive.  I love making these with my students!  They take some time and require some (well, a lot of) adult assistance, but are very cute when completed!


*UPDATE*
If you didn't catch my link and the top, I've put together a printable template on a new post, with ideas for using to make this project super easy!